ProPresenter – My Font Has An Acute Case Of “Devils Horns”
For some fonts in ProPresenter, when you add a stroke to the text and increase the thickness of the stroke you might run into these:
Some letters start to grow little “devils horns”
Basically the horns are caused by a combination of very acute (sharp) angles with a relatively thick stroked outline that is drawn with miter joins that have no limiting.
This seems to be the default (and only) option for stroking fonts in ProPresenter (up to 7.16.2 at the time of writing).Some applications offer additional control on how the stroke joins are drawn and these additional controls can be used (in those other applications) to limit the horns/spikes.
Appling a “limit” to cut off a Mitered join
Rounded Joins
Beveled Joins
Since ProPresenter does not have these controls over the join, there are a couple of well-known work-arounds…
Workaround 1: Reduce thickness
Workaround 2: Select a different font that has no highly-acute angles in the letters
Let the Nerd Fun Begin!
Let me show you how to remove the “highly acute” angles (aka “Sharp angles”) by editing the outline of the font letters using a font editor and then save as new font – It’s not too hard! There are freely available font editors for both Windows and MacOS. I’ve tried a couple of free font editoer and I like BirdFont and/or FontForge.
In this demo, I’ll use FontForge.
(Please note: Copyrighted fonts have pretty strict restrictions. Don’t go sharing any copyrighted fonts that you have edited. Even editing a copy of a copyrighted font for personal use on your own system might be a legally grey area)
Anyway….ah hem….In this example I will open and edit Helvetica Regular (a typically devilish font in ProPresenter) and modify the sharp angles in all of the letters that cause the horns when a thick stroke outline is added.
Where are the font files for existing fonts on my system?
MacOS:
User Fonts are in ~/Library/Fonts
System Fonts are in /System/Library/Font
Windows:
User Fonts are in %LOCALAPPDATA%\Microsoft\Windows\Fonts
System Fonts are in C:\Windows\Fonts
On either OS – If you want to edit a system font on MacOS, then I suggest to first make a copy of it in a non-system locatin (eg your desktop).
Open the font in FontForge. NB .ttf and .otf are common font files, but there are also font packages with multiple fonts inside (eg .ttc). These mulitple packages have a font for each style (bold/light/Oblique/etc)
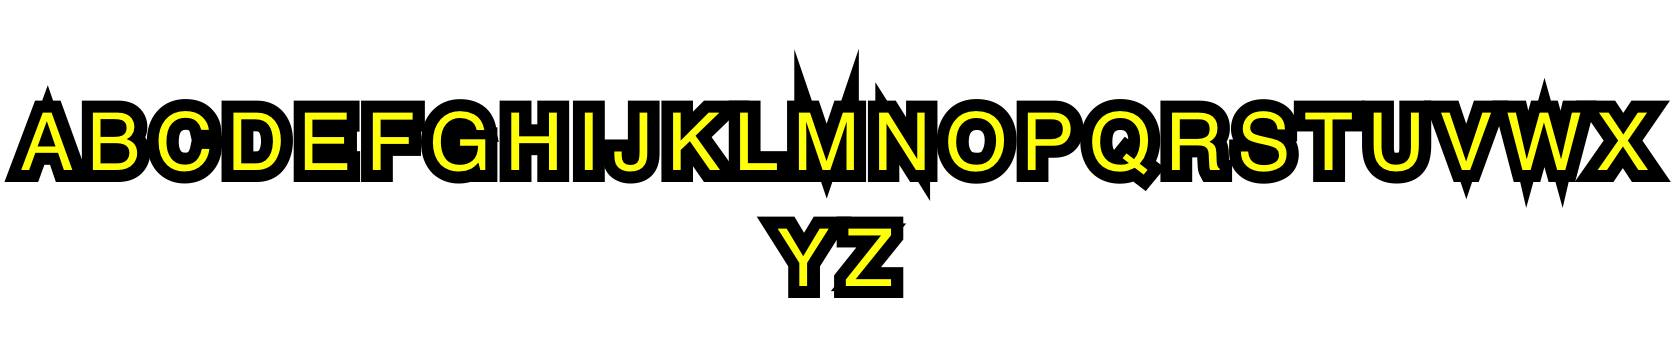
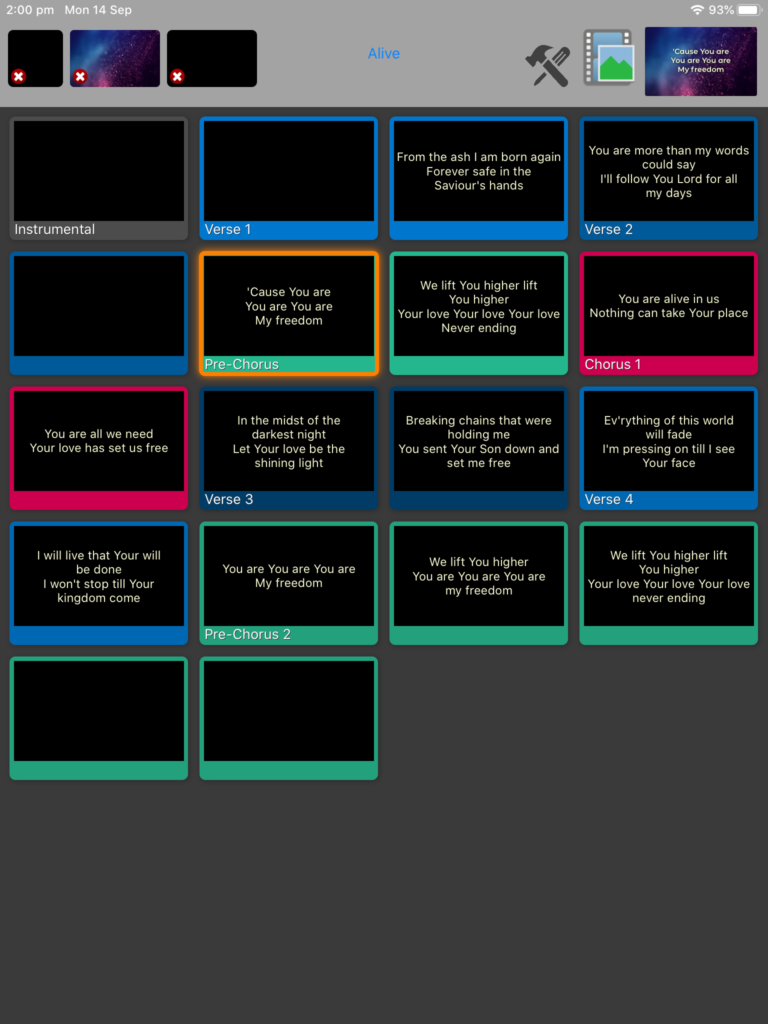
You will need to know which letters cause the horns. Did you notice the first image in this blog post – it’s a single slide in PropPresenter with the entire alphabet – both upper and lower case and all the numerical digits in a single text box that has a thick stroke applied – making it ewasy to see which letters or number have horns. These are the character glyphs that you need to edit in the font editor.
The trick is convert a sharp angle into tiny bevelled angle. A bevel so small the modification is unnoticeable and the font is essentially unchanged.
You do this by zooming very very close into the sharp points of acute angles and adding a second point a tiny distance from the sharp point to convert it to a tiny bevel.
To add a new point you click the “Add Corner Point (5)” button: (or press 5 on your keyboard)
Here is an example of removing one of the sharp angles in the capital letter W:
In total I had to edit about 6-7 letters in the Helvetica font.
After all the sharp angle are change to tiny bevels (with one extra point) you can go to the font properties and give it a new name (eg Helvetica-Hornless)
Editing the letters caused the font to discard hinting instructions for those letters. This basically ruined those letters for use at very small sizes – but I would never use the modified font in Pro6 at very small sizes – so I felt no need to remediate that.
Now make sure to update the properies of the font to change it’s name by going to the Element meni and selecting Font Info:
When you get a warning about changing the font UID, select “Change”
You can now save your new hornless font project (for future editing). This is just a FontForge project file…
To make a new font file, you need to GENERATE a new font.
The default option is a .ttf (which is probably fine)
Once you have a .ttf file, you can double-click that file to install it!
Here are some instructions to install ProPresenter 5 on a modern version of Windows 10 and also get SongSelect searches working again…
Disclaimer & Warnings
Before I start, I should make something perfectly clear….You should NOT do this….If you care about your team and can afford to do so, you should upgrade to a supportedversion of ProPresenter.
Consider blessing your team with an application that is supported!
ProPresenter 5 is no longer supported… you really are “on your own” if you have problems!!!!
Having said that…you might not be in a position to upgrade just yet and maybe it’s out of your control/budget…and perhaps you need to re-install propresenter5 on a new windows 10 machine just to get by? Fair enough – Here are some instructions from a stranger on the Internet that might buy you a little more time with Pro5 in Windows 10.
Usual disclaimers apply – this may not even work for you now and Pro5 may stop working in the near future – maybe even the very next Windows update that comes out each month!
Instructions
When you try to run the Pro5 installer on Windows 10 you will see an error message about missing .NET requirements – This is not true! Windows 10 natively includes all the required .NET components for Pro5. The installer “pre-flight check” that tries to make sure that the required version of .NET is present, no longer works correctly on Windows 10 and is literally making a mistake about it being missing!
Below I will show you how to manually edit the installer and fix that pre-flight check for .NET. This will allow the installer to run fine on Windows 10. To do this you will need to download an editor program for MSI Windows Installer Packages. There are several options, I like: http://www.instedit.com/download.html
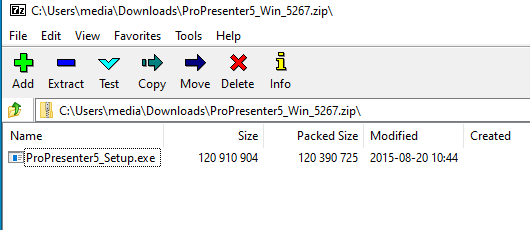
Of course, you will need the setup program for ProPresenter 5. Go to “version history” on the download page and scroll down past all the supported versions!) Download the setup zip file: ProPresenter5_Win_5267.zip.
Inside the zip file “ProPresenter5_Win_5267.zip” there is “ProPresenter5_Setup.exe” – you need to extract it and save in a folder somewhere on your computer…
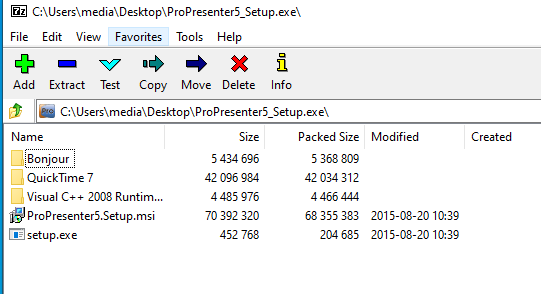
ProPresenter5_Setup.exe which you just saved on your computer is actually a self-extracting archive that contains other files for the setup for Pro5 (and several pre-requisite packages). You need to extract those setup files to a folder so you can edit the setup package before trying to run it from that folder.
You can view and manually extract the contents of the ProPresenter5_Setup.exe self-extracting archive with a good archiving program (I like 7-zip “https://www.7-zip.org/download.html” as seen in the screenshot above.)
Once extracted, you can do the fix (hack) with the MSI editor “InstEd It!”
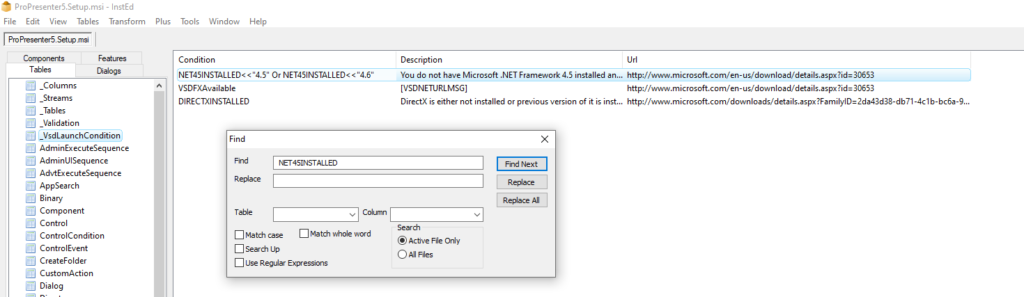
To Open ProPresenter5.Setup.msi in “InstEd It!” you can right click the .msi file after installing InstEdIt!, (there’s a new menu option added once InstEdIt is installed)
Press Ctrl-F to start a search
Do a search for: NET45INSTALLED You are looking for the condition: NET45INSTALLED<<“4.5” Or NET45INSTALLED<<“4.6”
When you find the condition NET45INSTALLED<<“4.5” Or NET45INSTALLED<<“4.6” you can double click it and change it’s description to: NET45INSTALLED<<“4”
Save the MSI and close “InstEd It” – it should be all good to go now on Windows 10!
You can double click setup.exe to install Pro5. (You can probably get away with skipping the pre-reqs and double-clicking the edited MSI package directly too – not sure)
To get SongSelect working again in Pro5
Sond Select stopped working for Pro5 on Win 10 due to changes the requried encryption for the connection. Pro was not updated to use the required method – but there is a setting to force ALL.NET programs on your computer to default to using the required encryption. Your mileage may vary – back out the change if think it causes a problem. I have found it to work just fine on my machines.
To force all .NET apps to use newer/better encryption that is now needed for Song Select, you need to add the following new DWORD value to the registry:
If we can’t have ProPresenter on an iPad…..what about “SimplePresenter”….
A long time ago I started work on a super, dumbed-down, simplified version of ProPresenter on an iPad. I got the prototype basically working and kinda stalled and shelved the idea for many months.
Since Pro7 came out, and the chips that Apple are making are just getting silly fast – I started to entertain the idea of picking the project back up again….
This weekend gone, I just added support for Pro7 presentations (using my reversed engineered .proto files) – and it worked a treat!
This is a Pro7 document!!!
Maybe there will be more to come on this…..(I still love the UX of the iPad soooo much and have some ideas for some nice UI interactions when using it to present)
This is part 3 in the series and it is a work in progress – its barely started in fact…
I have published it now for the sake of quickly sharing some example C# code and will update it over the next few days (maybe weeks).
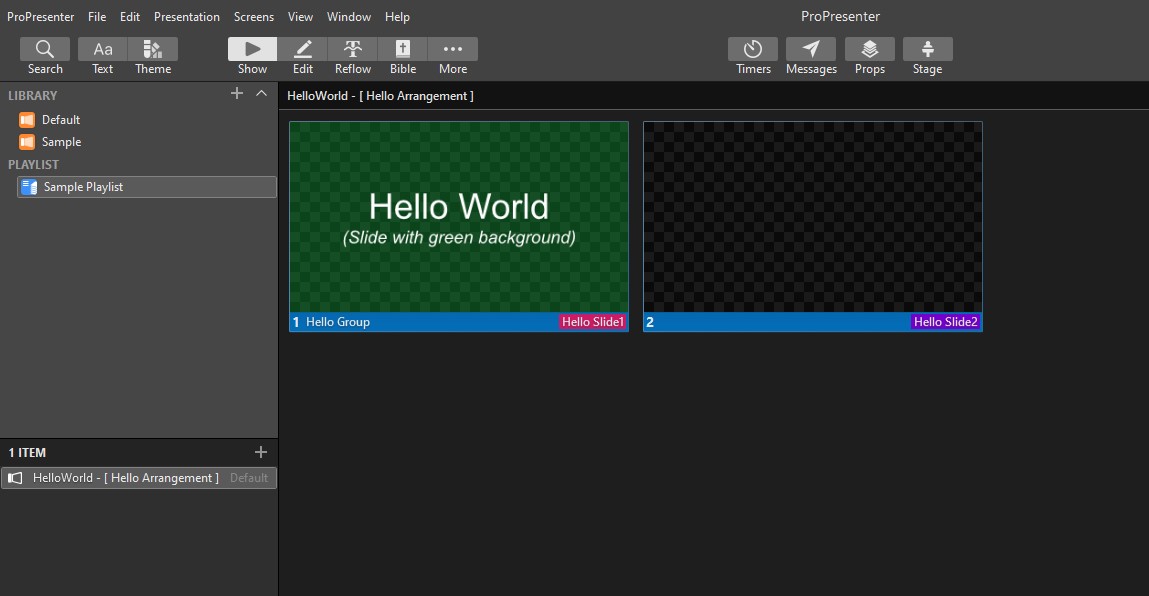
For now, you can find below the required C# code that will create a simple ProPresenter 7 document with two slides like this:
My First Pro7 Presentation Created By C# Code
TODO:
Demo how to use protoc to generate C# code from the .proto files
Demo making a new C# project, adding reference to Google.Protobuf and then adding all the generated C# code files
Demo writing simple code to create a document
DO a bit of a dive into structure of document and the RTF format used for text elements.
Point out that you can generate other languages (eg Python, Java)
Here is a dump of some manually written code that creates a new simple ProPresenter 7 document. The underlying “plumbing” code that enables this to work is auto-generated by the protoc compiler.
// You need to add these namespaces...
using Rv.Data;
using Google.Protobuf;


// Code to read an existing presentation and create a new one from scratch
Rv.Data.Presentation newPresentation, existingPresentation;

using (var input = File.OpenRead(@"C:\Users\media\Documents\ProPresenter\Libraries\Default\Alive.pro"))  // Path to existing presentation
{
    existingPresentation = Rv.Data.Presentation.Parser.ParseFrom(input);
} // Put in break point here to inspect existing presetation and learn the structure


//  ***** Create new presentation *****
newPresentation = new Rv.Data.Presentation
{
    Uuid = new UUID { String = Guid.NewGuid().ToString() },
    Name = "HelloWorld",
    ApplicationInfo = new ApplicationInfo
    {
        Application = ApplicationInfo.Types.Application.Propresenter,
        Platform = ApplicationInfo.Types.Platform.Windows
    }
};


// Create a new cue (with a single action of type presentation_slide)
Cue newCue = new Cue
{
    Uuid = new UUID { String = Guid.NewGuid().ToString() },
    IsEnabled = true,
    Actions = { new Rv.Data.Action
    {
        Uuid = new UUID { String = Guid.NewGuid().ToString() },
        IsEnabled = true,
        Label = new Rv.Data.Action.Types.Label
        {
            Text = "Hello Slide1",
            Color = new Rv.Data.Color
            {
                Red = 0.8f,
                Green = 0.1f,
                Blue = 0.4f,
                Alpha = 1
            }
        },
        Slide = new Rv.Data.Action.Types.SlideType
        {
            Presentation = new PresentationSlide
            {
                BaseSlide = new Slide
                {
                    Uuid = new UUID
                    {
                        String = Guid.NewGuid().ToString()
                    },
                    BackgroundColor = new Rv.Data.Color
                    {
                        Red = 0.05f,
                        Blue =0.2f,
                        Green = 0.6f,
                        Alpha = 0.4f
                    },
                    DrawsBackgroundColor = true,
                    Size = new Graphics.Types.Size
                    {
                        Width = 1920,
                        Height = 1080
                    },

                    Elements = {
                        new Slide.Types.Element {
                            Element_ = new Graphics.Types.Element
                            {
                                Uuid = new UUID
                                {
                                    String = Guid.NewGuid().ToString()
                                },
                                Fill = new Graphics.Types.Fill
                                {
                                    Color = new Rv.Data.Color{Alpha =0} // Transparent fill for element
                                },
                                Name = "Hello Element",
                                Bounds = new Graphics.Types.Rect {
                                    Origin = new Graphics.Types.Point {X =0, Y=0},
                                    Size = new Graphics.Types.Size {Width = 1920, Height = 1080}
                                },
                                Opacity = 1,
                                Text = new Graphics.Types.Text
                                {
                                    VerticalAlignment = Graphics.Types.Text.Types.VerticalAlignment.Middle,
                                    RtfData = ByteString.CopyFrom("{\\rtf0\\ansi\\ansicpg1252" +
                                    "{\\fonttbl\\f0\\fnil Arial;}" +
                                    "{\\colortbl\\red255\\green255\\blue255;}" +
                                    "{\\*\\expandedcolortbl\\csgenericrgb\\c100000\\c100000\\c100000\\c100000;\\csgenericrgb\\c100000\\c100000\\c100000\\c100000;}" +
                                    "{\\*\\listtable}{\\*\\listoverridetable}" +
                                    "\\uc1\\paperw12240\\margl0\\margr0\\margt0\\margb0" +
                                    "\\pard\\qc\\slmult0\\slleading0\\f0\\b0\\ul0\\strike0\\fs400\\cf0\\strokewidth0\\strokec1\\nosupersub Hello World"+
                                    "\\par\\pard\\qc\\slmult0\\slleading0\\f0\\i\\b0\\ul0\\strike0\\fs200\\cf0\\strokewidth0\\strokec1\\nosupersub (Slide with green background)}",
                                    Encoding.ASCII),
                                },
                                Path = new Graphics.Types.Path
                                {
                                    Shape = new Graphics.Types.Path.Types.Shape
                                    {
                                        Type = Graphics.Types.Path.Types.Shape.Types.Type.Rectangle
                                    }
                                },


                            }
                        }
                    }

                }
            }
        },
        Type = Rv.Data.Action.Types.ActionType.PresentationSlide
    }
    }
};

// Add new cue (slide)
newPresentation.Cues.Add(newCue);

Cue newCue2 = new Cue
{
    Uuid = new UUID
    {
        String = Guid.NewGuid().ToString()
    },
    IsEnabled = true,
    Actions = { new Rv.Data.Action
    {
        Uuid = new UUID
        {
            String = Guid.NewGuid().ToString()
        },
        Label = new Rv.Data.Action.Types.Label
        {
            Text = "Hello Slide2",
            Color = new Rv.Data.Color
            {
                Red = 0.46f,
                Green = 0.0f,
                Blue = 0.8f,
                Alpha = 1}
        },
        Slide = new Rv.Data.Action.Types.SlideType
        {
            Presentation = new PresentationSlide
            {
                BaseSlide = new Slide
                {
                    Uuid = new UUID
                    {
                        String = Guid.NewGuid().ToString()
                    },
                    BackgroundColor = new Rv.Data.Color
                    {
                        Red = 1,
                        Green = 1,
                        Blue = 1,
                        Alpha = 1
                    },
                    Size = new Graphics.Types.Size
                    {
                        Width = 1920,
                        Height = 1080
                    }
                }
            }

        },
        Type = Rv.Data.Action.Types.ActionType.PresentationSlide,
    }
    }
};

// Add new cue (slide)
newPresentation.Cues.Add(newCue2);


// Add a new group with above two slides
newPresentation.CueGroups.Add(new Presentation.Types.CueGroup
{
    CueIdentifiers = { newCue.Uuid, newCue2.Uuid },
    Group = new Group
    {
        Uuid = new UUID
        {
            String = Guid.NewGuid().ToString()
        },
        Name = "Hello Group",
        Color = new Rv.Data.Color
        {
            Red = 0.0f,
            Green = 0.467f,
            Blue = 0.8f,
            Alpha = 1
        }
    },

}
);


// Create a single arrangement with above group
newPresentation.Arrangements.Add(new Presentation.Types.Arrangement
{

    Uuid = new UUID
    {
        String = Guid.NewGuid().ToString()
    },
    Name = "Hello Arrangement",

    // Just add the one group to this arrangement
    GroupIdentifiers = { newPresentation.CueGroups[0].Group.Uuid }

});

// Set selecte arrangement to the one and only arrangement
newPresentation.SelectedArrangement = newPresentation.Arrangements[0].Uuid;

// Save to file!
using (var fileStream = File.Create(@"C:\Users\media\Documents\ProPresenter\Libraries\Default\HelloWorld.pro"))
{
    newPresentation.WriteTo(fileStream); // This is an override method provided in Google.Protobuf namespace (make sure to add a using Google.Protobuf;)
}
</div>
</div>
</div>
</div>
Part 2 of a technical exploration of the ProPresenter 7 file format (.pro)
N.B. This information is probably only of interest to developers – nothing here will be of any real use to “regular users” of ProPresenter.
TLDR: I now have a useable set of proto files that enable programmers to automatically generate code for their applications and scripts that can work directly with pro7 document and configuration files.
In part 1 of my series on exploring the new Pro7 file format, I had discovered that Pro7 uses Google protocol buffers and started to reverse engineer the structure of the (.pro) document file format. I now have a somewhat-complete and useable set of proto files that enable programmers to create code for their applications and scripts that can work directly with pro7 document and configuration files.
If you are a programmer who has built applications or scripts to work with .pro6 documents, this might be of interest to you. You will need to understand how to use .proto files, the tutorials by Google are great – read them to quickly get up to speed on how easy it is to automatically generate code from .proto files!
Please note that the .proto files I have created are unsupported reverse-engineered files. Do NOT contact Renewed Vision (the makers of ProPresenter) for support if you blow up your documents, configuration or the entire computer!
How were they reverse-engineered?
This is not important, and you might like to skip ahead to the next section. This is a rough overview of how the .proto files were reverse engineered – just in case there any nerds out there that are interested.
In my first post I started doing this by manual methods. Over the weeks that followed, I found a much better way. It turns out that the Google protocol buffer compiler generates C#.NET code that allows the use of Reflection in .NET to get the required information to rebuild the .proto files that were originally used to generate it. An example is given at the end of the Protocol Buffer Basics: C# Tutorial…
publicvoidPrintMessage(IMessage message){var descriptor = message.Descriptor;foreach(var field in descriptor.Fields.InDeclarationOrder()){Console.WriteLine("Field {0} ({1}): {2}",
field.FieldNumber,
field.Name,
field.Accessor.GetValue(message);}}
ProPresenter 7 is written in .NET so I could employ this method by creating a new .NET project, and adding references to several of the Pro7 .NET class libraries which are stored in .dll files. After some time exploring, I was able to create a PlaylistDocument object and then use reflection on that object to walk through the data structures and write out the .proto definitions for the playlist and also all of its dependencies (which includes presentations). I won’t go into any more detail here as it’s a bit off topic and it involved some recursive code that made my head hurt!
By the way, the idea that you can load .NET class libraries (stored in .dll files) from other applications and use functionality within them is so cool that I think it deserves a whole other blog post in itself. A lot of functionality is exposed through the Pro7 class libraries and I might explore them and make another blog post later.
Anyway – the key point is that I now have a complete set of .proto files that seem to work – so it’s time to explore and play!
Using Google “protoc” to decode and explore Pro7 files
Before using protoc to generate code that canwork with ProPresenter files I noticed that protoc can also decode existing protocol buffer files and reveal their data structure in a human readable format.
This seemed like a good way to quickly test my newly reversed engineered .proto files and start exploring the data structures. Using the protoc command to decode existing files and checking if the output looked sensible would give me confidence that the reverse engineered .proto files are working. The command to do this for decoding a Presentation document is:
The output from these commands is JSON-like plain text representation of the data in the file which is easy enough to read and start exploring the structure. There are also .proto files to work with other data and configuration files as well eg: masks, props, looks, proworkspace, screens, timers, calendars etc.
For now, lets explore the presentation format…
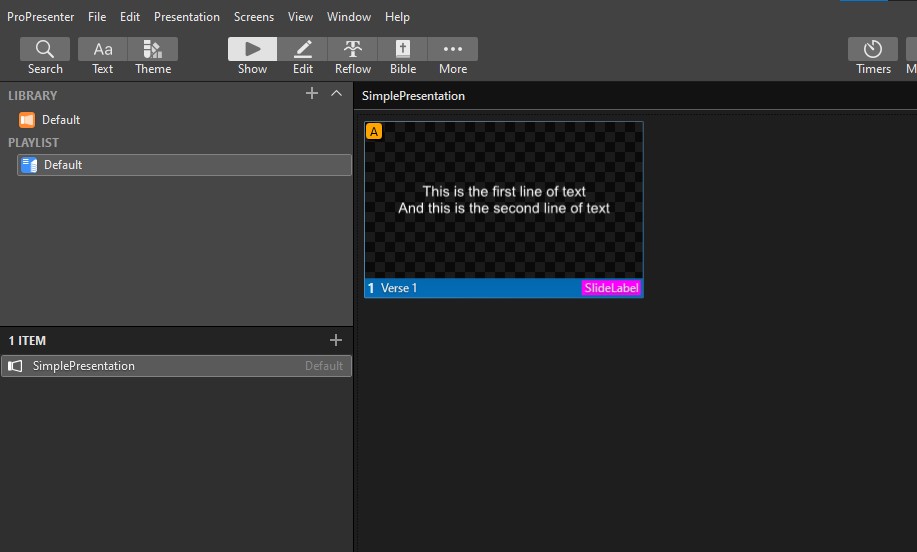
There is a lot of data in a presentation file so I decided to create a simple presentation that has just a single slide in a “Verse 1” group with a custom slide label and explore the decoded text of that first.
A Simple Presentation – Ready to decode and learn from!
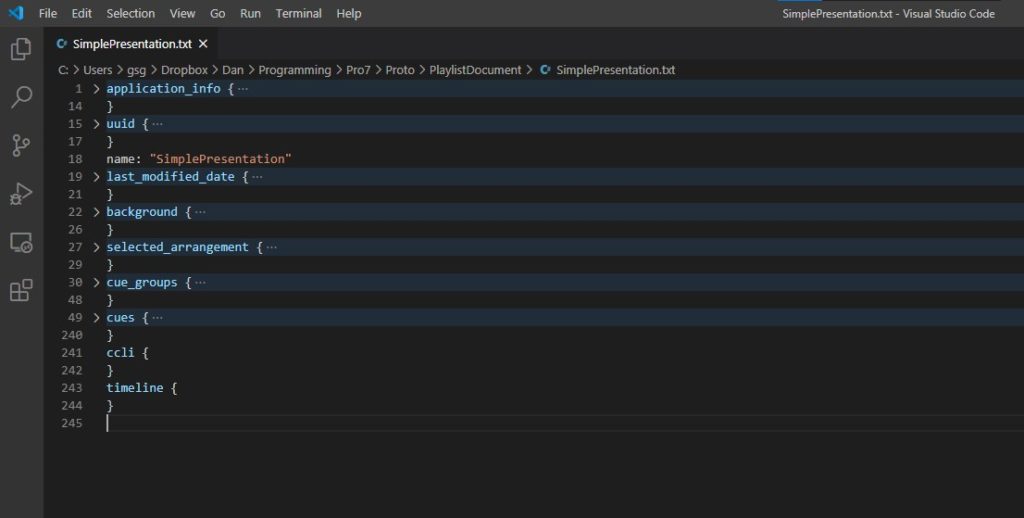
Decoding the simple presentation file resulted in several pages of JSON like text in my terminal. To make it easier to review the decoded output, I redirected the output into a text file called “SimplePresentation.txt” so that I could then open and review that file in my favourite text editor Visual Studio Code (VSCode)
VSCode is an awesome editor and it makes it much easier to review and understand the JSON-like text structure thanks to coloured syntax highlighting and collapsible text sections. At first, I tried the JSON syntax highlighter in VSCode, but later found I actually preferred the C# syntax highlighting for this output.
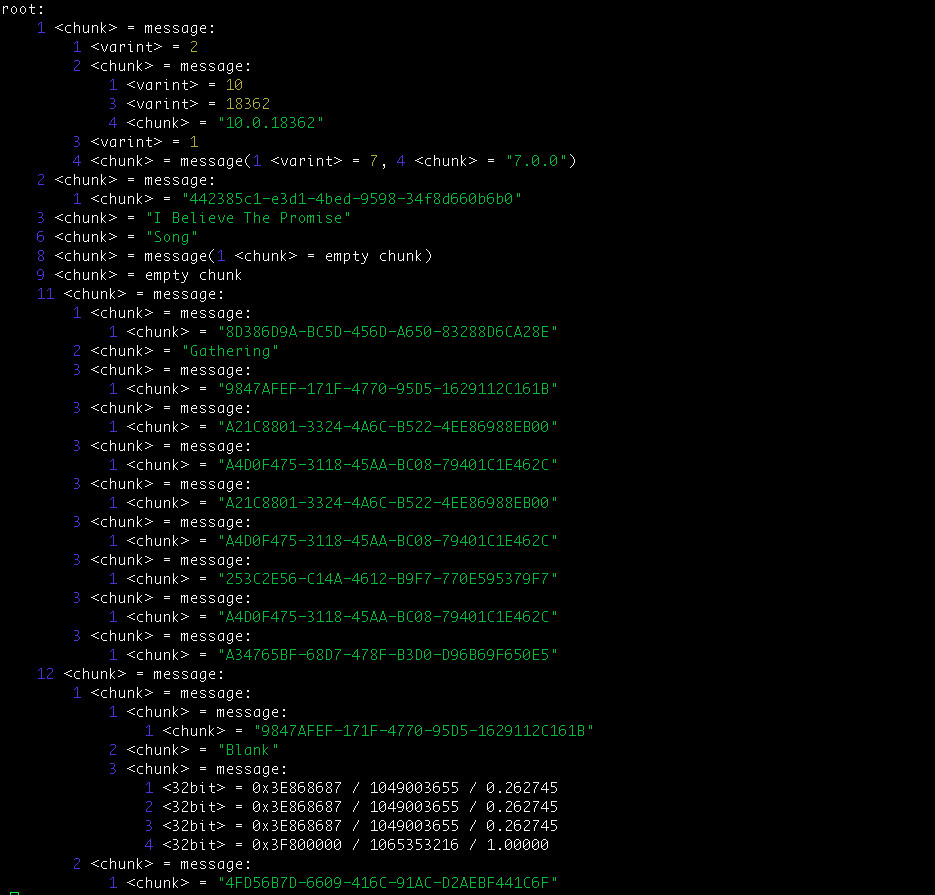
Here is the complete output This is selectable text (with syntax colouring is provided by a plugin on this blog).
As you can see above, there is a quite a bit of data even in a simple presentation – but it seems the proto files needed for presentation files are working well and if you have these .proto files, you have the power to easily create, read and update Pro7 data files!
A great feature built into Visual Studio Code is that it lets you collapse logical sections of text and this makes it much easier to look at and learn the structure of the data:
The collapsed view makes it easier explore and learn the presentation structure.
Application Info
This describes which application and which operating system that the presentation file was created with. It also includes version info for both.
UUID
This is the unique identifier for the presentation.UUIDs are used throughout ProPresenter documents as identifiers for many objects. They are stored in PRo7 documents using a standard textual string representation that 36 characters long. What’s quite interesting about GUIDs is that they are basically globally unique – no two GUIDS in the world are the same when generated using standard methods. .NET includes a standard method to generate them which I’ll use a lot later when building my own presentation from scratch in code.
Name
This one is self-describing!
Last Modified Date
At first glance, you might think “why not use the filesystem last modified date” – I suppose there are some circumstances where it might differ – eg, if the file was touched/corrupted by an application that doesn’t understand the file format
Background
There is no background in this simple presentation – explore this later.
Selected Arrangement
This is the UUID of the currently selected arrangement. In this simple presentation there are no arrangements defined – so I suppose this becomes a UUID for the “master arrangement” of how the slides are defined.
Cue Groups
In this simple presentation there is only one group “Verse 1”. If there were more than one group, then you would see multiple “cue_groups” in a list.
Cues
Slides are found inside cues. There is only one slide in this simple presentation, so there is only one cue in the decoded data. If there were multiple slides in the presentation, there would be multiple “cues” in a list.
The structure of a cue is rather complex at first glance. Briefly, cues contain a list of actions and there are several action types of actions. One of the many type of actions is for representing a slide: “ACTION_TYPE_PRESENTATION_SLIDE”. Any action that is a “ACTION_TYPE_PRESENTATION_SLIDE” contains a slide object. That slide object contains a presentation object. That presentation object contains a base-slide object That base_slide object which contains a list of slide elements (text elements etc)
Ccli
There is no Copyright info in this simple presentation – explore this later.
Timeline
There is no timeline in this simple presentation – explore this later.
That’s a brief exploration of the file structure using decoded output from protoc. However, the point of protoc is to “compile” .proto files into code that you can use in your own applications and scripts to easily create, read and modify these files.
In part 3, I will generate some C# code from these .proto files and demonstrate reading existing ProPresenter documents as well as creating a ProPresenter document from scratch in my own custom application!
Teaser: My First Pro7 Presentation Created From Scratch In My Own C# Application
An early peek at a technical exploration of the ProPresenter 7 file format (.pro)
N.B. This information is probably only of interest to developers – nothing here will be of any real use to “regular users” of ProPresenter.
TLDR: Pro6 documents are XML, Pro7 documents (and config files) are Google protocol buffers. To read and write .pro files you will need a complete set of .proto files that describe all the possible messages that the .pro file might contain – if you have these .proto files Google makes it super easy to create code to read/write .pro files. I’ve started work on reverse engineering the messages and manually creating .proto files to eventually allow this.
I love computers – especially automation (making things happen automatically) and integration (making things works well together). I also love all aspects of working with ProPresenter including system design, show setup and operating.
I was quite an excited nerd when I first noticed that the ProPresenter 6 document file format was human-readable XML that was somewhat “self-describing” so that it was easy to figure out what it all meant.
I could use my knowledge of computers, programming and scripting to work with ProPresenter documents directly and automate all sorts of otherwise laborious tasks, like that time I wanted to rename our standard arrangement names or even create utility applications like All-Caps for Windows or Volume editor for MacOS.
.pro6 files are an “easy to figure out”, human readable XML
I’m not the only one who has noticed that the .pro6 file format was human-readable XML and quite clear to figure out.
There are others I’ve seen posting in the Official FaceBook Users Group doing the same thing and making scripts and programs that automate their own workflows.
Naturally I was excited when Pro7 came out – I even joined the beta testers group. I have really enjoyed exploring all the wonderful new features right and was blown away by the performance and possibilities with the new Windows version!
However, when I took a look inside the .pro document file format, I got a bit of a surprise!
They are no longer 100% human readable XML and instead seem to be some sort of mix of binary and plain text.
ProPresenter 7 .pro files seem to be a mix of binary and plain text
I can’t remember exactly how I figured it out, but I now know that Pro7 documents (and configuration files) are actually Google Protocol Buffers written to file
What are Google protocol buffers?
Let me quote from Google to best summarise what protocol buffers actually are….
Protocol buffers are Google’s language-neutral, platform-neutral, extensible mechanism for serializing structured data – think XML, but smaller, faster, and simpler. You define how you want your data to be structured once, then you can use special generated source code to easily write and read your structured data to and from a variety of data streams and using a variety of languages.
Also, here is a good introduction to how a developer uses protocol buffers….
You specify how you want the information you’re serializing to be structured by defining protocol buffer message types in .proto files. Each protocol buffer message is a small logical record of information, containing a series of name-value pairs
Once you’ve defined your messages, you run the protocol buffer compiler for your application’s language on your .proto file to generate data access classes. These provide simple accessors for each field (like name() and set_name()) as well as methods to serialize/parse the whole structure to/from raw bytes
What this means for developers is that once they have their data structures defined in (human readable) .proto files, then the Google protocol buffer compiler will take that .proto file and automatically generate all the code you need to create your data structures, store them to file and later read them back from that same file – and this is what ProPresenter uses for it’s files.
It’s actually pretty cool that the Google protocol buffer compiler can take your .proto file and generate code for a number of popular languages.
Are there apps/tools to view Google protocol buffers?
What if I want to look inside the .pro files and understand what is stored in there?
There are a few apps/scripts I’ve found that can display the contents of a Google protocol buffer – however, it’s not as useful as I had hoped since the name of each data field is NOT stored in the protocol buffer – so these viewer applications can only show the hierarchy of data values without any naming!
Here is a look at a .pro file with a Python script and a MacOS app for viewing the data within protobuf files.
https://github.com/mildsunrise/protobuf-inspector
https://sourceforge.net/projects/protobufviewer/
Although the viewers can’t display the names of each field in the data structure (since they are not present in the data), it’s not too hard to start guessing what each data field is!
This is especially easier when you compare a .pro6 file with human readable XML to the resultant .pro file once it has been imported into Pro7. Combining that with a few other reverse engineering tricks, and I’ve been able to make a start of re-creating a working .proto for .pro presentation files.
It’s not much yet, but over the next few months, I hope to have figured out enough to read and write .pro files once again!
I’ll do a part 2 and include a GitHub repository!
ProPresenter 7 is an exciting new version that was written from the ground up on both Mac-OS and Windows. Perhaps the biggest change was that the new Windows version of ProPresenter finally has the same feature set as it’s twin on Mac-OS and has just become a “big boy” 64-bit application just like the Mac-OS version has been for years.
I was a part of the early beta-testing group and did quite a lot of testing on both platforms. The new features are amazing and I really enjoy them. However, this post is not about any of new features – plenty has been written already about the new features. I wanted to write about something else…
The surprising performance of ProPresenter 7 on Windows 10!
The biggest surprise for me was that ProPresenter 7 performs so well on Windows 10 and has the same features as the Mac version!
Now, we use ProPresenter at my Church and I’ve always preferred running ProPresenter 6 on Macs for several reasons – the two most important to me were:
We used features that were only available on the Mac-OS version (MIDI, All-Caps etc).
We enjoyed the much smoother performance on comparable hardware.
I am comfortable supporting either platform – so the choice was easy.
For me, Macs were the first-class platform of choice for ProPresenter…
…But that idea is now seriously challenged.
When I began beta testing, I wanted to test on both platforms so I could compare and contrast.
I borrowed an old gaming PC from a friend with the following specs:
i7-2600 @ 3.4Ghz, 16Gb Ram, GeForce GTX 670 GPU and 512GB SSD.
That CPU and GPU were top-shelf “back in the day” but now you will find them both in the lower-middle section in any current performance charts.
Every time I use ProPresenter 7 on this middle-of-the-road desktop gaming PC a phrase keeps echoing in my mind: “I really think this is going to be a game changer!”
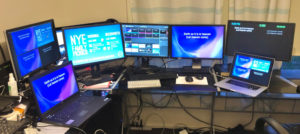
When I began testing on Windows, I borrowed four monitors to connect to PC so I could have a setup that included outputs for the ProPresenter application window in addition to Audience, Stage-Display and Announcements outputs. (The act of simply plugging in four displays is something that is already foreign to most Mac owners as most Macs don’t have the GPU power and/or hardware ports to do so.)
The old PC ran four outputs, playing two different 1080p30 videos, without breaking a sweat. ProPresenter 7 lets you send a different presentation to an Announcements output while running a presentation on your main Audience output. I tested with full-screen 1080p 30fps videos to both of these. That’s two different videos at the same time.
How much more could this system handle?
I suspect rendering outputs amounts to quite a chunk of the total load so I wanted to add more outputs and push the system “a littler harder”.
I had no more free ports in the GTX-670 to plug in any more monitors, so I took advantage of NDI support in ProPresenter 7 and added three more NDI outputs. (NDI is one of many IP video streaming technologies where you can send video signals over your computer network and any clients on your network that understand the protocol can see those video streams and display them.)
I used the NDI tools “Monitor” software on three other computers on my home network to display these extra NDI outputs. It worked a treat and the old gaming PC handled three more “outputs” well.
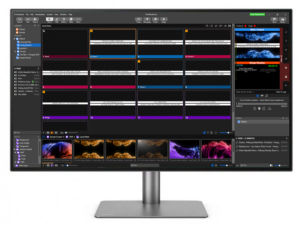
Take a look at the system load while ProPresenter 7 was rendering seven outputs from an old gaming Windows desktop PC.
The CPU and GPU are both working at around 30% and there was plenty of free RAM.
It’s worth noting, that in addition to the main output having a full-screen background motion and the announcements output having slides and full screen videos looping I also had several other screens rendering duplicate previews of those videos in quad views!….
Is ProPresenter 7 on Windows now “better” than on Mac?
Is there something magic about ProPresenter 7 that will makes it perform better than its Mac-Os twin on comparable hardware? – I don’t think so.
I think ProPresenter 7 on Windows has finally “caught up” – It’s no longer the little brother, but one of equal twins that perform well on both platforms when run on comparable hardware.
Given that the performance and features for ProPresenter 7 on Windows and Mac-OS are now comparable, I think the Windows version will still be a game changer because:
1. For Churches that are comfortable to run Windows: ProPresenter 7 is now feature complete and while performing just as well on comparable hardware, it can be fair bit a cheaper to buy comparable PC hardware if you don’t need or care about beautiful 5K displays.
2. “Output-happy” setups are so cheap and easy: If instead of comparable power, you had a need for LOTS MORE GPU power to run lots of outputs in ProPresenter 7 – it’s currently a much easier and cheaper to do that on desktop PCs (thanks mainly to much more powerful CPU choices)
I suspect those that get carried away with multiple outputs will love what can be achieved with powerful GPUs in desktop PCs!
I will continue testing both platforms and thinking about our setup, environment and ways of working. I like both platforms and can support and work with either.
It’s just so easy and cheap to build a super-powerful desktop that can easily handle many outputs and then put them to use in ProPresenter 7.
This makes thought of an “seven-output-happy” desktop PC machine with two 34″ 4K displays for the ProPresenter operator, running an audience output, two different stage displays, an announcement output in the lobby and a lower thirds on the stream for a whole lot of $$$ less than doing the same on an iMac pretty tempting.